--- Core ---
JANOS 2.0 UPDATED

DCP 2.4

--- Bundled ---
FTP Client
MODBUS Server 1.7.236
Serial Control 7.0.31 UPDATED
Serial To Ethernet 6.0.48
Slaving Service 2.0.104 UPDATED
SNMP 3.1.667 UPDATED
Tasker 5.0.1505 ADDED
Task Manager 7.0.351

All-In-One 200501 May 1, 2020

--- Core ---
JANOS 1.9 UPDATED

DCP 2.4

--- Bundled ---
FTP Client
MODBUS Server 1.7.236
Serial Control 5.0.122.1501
Serial To Ethernet 6.0.48
Slaving Service 1.5.1810.225
SNMP 2.6.532 UPDATED
Task Manager 7.0.351

All-In-One 200203 February 3, 2020

--- Core ---
JANOS 1.9 UPDATED

DCP 2.4 UPDATED

--- Bundled ---
FTP Client
MODBUS Server 1.7.236
Serial Control 5.0.122.1501
Serial To Ethernet 6.0.48
Slaving Service 1.5.1810.225
SNMP 2.4.1.494
Task Manager 7.0.351

All-In-One 190618 June 18, 2019

--- Core ---
JANOS 1.8
DCP 2.3

--- Bundled ---
FTP Client
MODBUS Server 1.7.236
Serial Control 5.0.122.1501
Serial To Ethernet 6.0.48
Slaving Service 1.5.1810.225
SNMP 2.4.1.494
Task Manager 7.0.351

When an operating system like JANOS is created it first reaches out to the world through the simplest communications channel, a serial port. When the developer then wants to interact with the new OS, commands are entered through that Command Line Interface. Soon a reasonable vocabulary of commands are made available for use and this becomes the developer’s Console.

As the operating system finds new ways to communicate with its surroundings it discovers the network and begins to support useful protocols. Logically the first would be some serial channel simulation (Telnet) over which it can offer access to its Command Line Interface for use by others. Eventually, graphical user interfaces emerge and a more modern and user-friendly environment comes into existence.

While the Command Line may seem Old School and it may generate some apprehension on the part of a new user, it is the Go-To utility for the developer. It is here that the system’s vitals can be monitored and the OS can be encouraged to perform for us. It is no surprise that the Command Line has been a key element of the JNIOR from the beginning. We will cover aspects of this user interface that have been enhanced with JANOS v2.0.

Persistent Command History

Every JNIOR, even back to the Series 3, memorized a few commands as you entered them during the Console session. It has always been possible to scroll back to a prior command using the cursor UPARROW and DNARROW keys. This allowed you to scroll to a command and re-execute it by hitting ENTER. You could even edit the command to create a new similar command and execute that. The Series 4 more than doubled the number of individual commands that it would remember during the session.

With JANOS v2.0 this command line history is now persistent. Meaning that you can exit the Console session, return at a later time and scroll back to commands that were entered in prior sessions. This persistent history is saved by User and so each user has his/her own. The same user can even access the Console simultaneously through different channels and retrieve past command history, not have confusion over commands entered in the other session, and see the logical combination of activities later. The number of commands remembered has been expanded to 99. This history, however, remains available ONLY as long as the JNIOR stays powered.

HISTORY Command

The HISTORY command has always been available and it displays those memorized commands. With Series 3 it was just a few and with Series 4 a longer list. But in those instances it otherwise had little utility.

With JANOS v2.0 the HISTORY command has been expanded to provide better access to the (now larger) record of commands. 

bruce_dev /> help history
HISTORY [index|regex]

Options:
index Integer selects command for editing
regex Used for case-insensitive search

Accesses the command line history.
Aliases: HIST, HISTORY

bruce_dev />

For example, if you had entered a command earlier to reboot the JNIOR with some options that you now want to repeat, you can locate that command by typing hist boot. The HIST command being just a shortened alias for HISTORY. The “boot” text is used as a Regular Expression to search the history and any line matching the inquiry is listed. If there is only one matching line it will be selected and brought to the command line to be edited or executed. This command is now very useful.

When multiple lines are listed they are enumerated. You can select any command by entering its index. For example, hist 5 will retrieve the command line displayed with index 5 for editing and execution.

TAB Key

The <TAB> key has become useful in later versions of JANOS. It provides a means of auto-completion. For example, when entering a parameter to a command you can type the first couple of characters of a file or folder name and use the <TAB> key.  JANOS will finish the entry with matching file of folder names. Repeated use of the <TAB> key scrolls through all possible matches and returns to your original line if none meets your need. If the name you seek is displayed you can merely continue to enter your command having been saved from explicitly typing the entire file or folder specification. Warning: You will become addicted to this aid. As much as you want it to, the Series 3 will not do it.

The <TAB> key in fact is context sensitive. If you are entering a REGISTRY command (REG for short) the auto-completion will use known or existing Registry keys instead of file or folder names. In addition, if you have entered the REG command, a Registry key and then the equals ‘=’ sign, if you immediately hit <TAB> (before any space) the current key’s value will be supplied. This is very useful, first if you cannot precisely remember a Registry key and then if you only want to modify the existing value slightly.

The context for auto-completion may be ambiguous in some places. JANOS may offer Registry keys when you in fact desire a Filename. As an alternative to the <TAB> key in those situations, if you need a file name you may use the Ctrl-F keystroke. Similarly, if you need a Registry key, you can use Ctrl-R.

At the beginning of a line you can enter the first character or two of a command and use <TAB>. This will auto-complete with valid commands and even offer matching commands from your command history.  But, of course, some people do like to type.

Finally, imagine that you have just loaded an unruly named UPD file into the /temp folder and need to execute a manual update using the JRUPDATE command. The following generally builds the command for you without much thought:

jru<TAB> -fup t<TAB>/<TAB>

The above sequence could save you from typing something like this:

jrupdate -fup temp/janos-2.4.2.upd

This is best experienced through experimentation. Give it a try.

That command, by the way, would update the operating system and only the operating system on the JNIOR.  The -U option schedules the update provided by the UPD file; The -F option (which can be specified as show or as a separate option and anywhere in the command) answers Yes to the confirmation prompt; And, the -P option Proceeds after ingesting the UPD file to perform the reboot and associated update.

More thorough updates are completed using the Support Tool and the appropriate Update Projects.
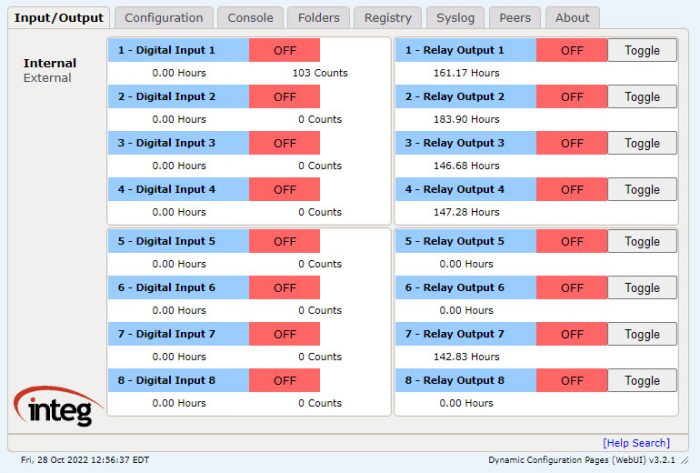
 

The JNIOR automation controller is a single board computing device supporting a variety of I/O. Once installed the product generally works tirelessly to perform its intended purpose. There is no need for routine user interfaces such as display, mouse and keyboard. When configuration, programming and maintenance tasks are required the user can access the device in a number of ways. One of those is the most general and capable. That is the WebServer User Interface or WebUI accessed through the network using a general purpose browser.


This WebUI is often referred to as our Dynamic Configuration Pages or DCP. The DCP acronym conflicts with other uses especially in the Cinema industry where it refers to the Digital Cinema Package that is used to deliver content (movies). So we now simply call it “The WebUI”.

This one ‘website’ allows you to completely manage your JNIOR. You can both control I/O and configure most of the system on various tabs here. This also provides a convenient means of moving files on and off of the unit. Even the Command Line Interface or Console is available, as one of the tabs provides a terminal simulation. The JNIOR must be wired to the network and assigned proper Internet Protocol (IP) addressing. You simply point the browser to it.

JANOS v2

The WebUI supplied with JANOS v2.0 appears much the same as it has throughout the Series 4. One big change is that you can now resize the display by dragging the lower right corner. That might be particularly useful if you are working in the Console tab or exploring Folders containing numerous files. It also has obvious value in viewing the Syslog or About tab content.

A somewhat less obvious enhancement is the VT-100 capability that the Console tab now has to support the new built-in simple text editor command EDIT. This feature offers a means to edit small files and scripts directly on the JNIOR avoiding the need to extract the file to your computer, editing it there and then replacing it on the unit. That’s a tedious process especially if you are trying different things and making repeated changes to files. The editor can also provide a means by which you can page through a lengthy file or log.

Relocation

A feature of the JNIOR WebServer is its ability to serve an entire website directly out of a single ZIP library file. This avoids a very common problem wherein the multiple files required by websites can easily get out of sync and cause page problems. On the JNIOR all of the files are in one package and stay there. All that is required to update the website including our WebUI is to replace one single file.

On Series 4 JNIORs running JANOS v1 the WebUI lives in the /flash/www.zip file. It is the default website offered by the unit. This works because the default WebServer root folder is /flash/www and the WebServer looks there first for requested files. If they are not found it then looks in any ZIP library file of the same name as the folder. So by default it would then look in www.zip.

You might think that if the JNIOR has a fully capable WebServer could you create a custom website for your specific application? Yes, you absolutely can. You likely wouldn’t want to lose the ability to access the configuration WebUI. Well that is easily accomplished by first moving the /flash/www.zip file to /flash/www/config.zip. Note the name change. Once this is done to access the Dynamic Configuration Pages you append the /config folder to the unit’s URL. The Webserver would look for the initial page in /flash/www/config and not finding it there then look in the config.zip file. This works even for sub-folders in the ZIP library file. Once you have done this you can now place your custom website in the root and it will become the default.

JANOS v2 now is supplied with the WebUI already relocated as described. By default the WebServer search path now includes the /flash/www/config folder. So if there is no custom default website defined the WebUI will automatically open.

The importance of this relocation relates to future updates. We need the ability to update the config.zip file. If you implement a custom website and want to take advantage of the single distribution file you would necessarily have to name it www.zip. You would likely not appreciate it if you overwrote your website in an update. So now we are proactively avoiding the issue. 

By the way, there are even more ingenious ways of setting up sets of custom websites on the JNIOR. If you are interested you can find out more through INTEG Support.

Ten years ago the challenge facing INTEG was to insure the future of JNIOR automation and to continue our commitment to our customers and the industries that they serve. We had been successfully supplying JNIOR Series 3 into growing markets when we received word from suppliers that the heart of the product, its processor and operating system, were approaching End of Life. Moving to a new processor would introduce third-party software potentially completely changing the product as we had built it. That would not be acceptable. Our solution was to insure that new software developed completely in-house built upon, and not altered, the product and its design. It was at that point that the JANOS operating system was born.

As our ability to produce Series 3 JNIOR drew to a close we prepared the release of JNIOR Series 4 running JANOS v1.0. It was a new, faster and more reliable automation controller meeting our demand that it serve as a drop-in replacement for Series 3 and continue seamless and uninterrupted support for all those who had selected JNIOR. It has been a great product and JNIOR Series 4 is current and successful today.  It remains the choice if flexibility, reliability, long-term availability, and unprecedented personalized customer support are of concern to you.

With a decade of JANOS v1 behind us the time has come to introduce JANOS v2 as the most reliable and most capable release to date. Unlike other version 2.0 products, JANOS v2 is not a complete rewrite, it does not change the way you see or do anything, and does not introduce risk or a new learning curve. It continues in our tradition of maintaining backwards compatibility while expanding the value the operating system offers developers. The JNIOR will remain solid and reliable for years to come. We look forward to a Series 5.

In addition to normal corrections and performance improvements here is some of what is new in v2.0:

  • Improved diagnostics and logging
  • Experimental access via File Sharing
  • Expanded TLS Security
  • Built-in JSON support
  • Enhanced Batch and Scripting capabilities
  • much more…

Look for JANOS v2 Tips & Tricks here on jnior.com and feel free to contact INTEG Support through our website at www.integpg.com . And by all means you can apply the v2 update to all of your JNIOR Series 4 with confidence. We highly recommend it.

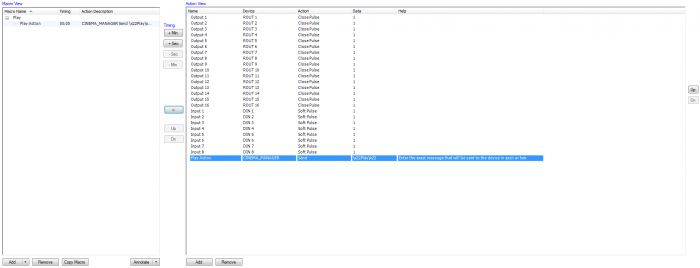
When creating a macro using the JNIOR Support Tool, you may want data being sent in a command to contain quotes. This can be done, but its important to know how. When adding quotes, you can’t type them directly in because it will disrupt the csv format that macro files are saved as. To get around this, you type the hex value for quotes in the data field to implement them, which is \x22. So as an example if you had a macro named Play and you wanted to surround in quotes when adding it in the data field of a macro action, you would type \x22Play\x22 instead of “Play” in the data field of a macro action.

Macro tab of the JNIOR Support Tool
Name Version Release Date Size MD5
Cinema.jar - Update Project v6.9 Jan 03 2024 545.1 KB 0a2c670e461116768b75288e652c5253

4.0, 4 oct 2019

  • [+] added code to detect barco series 4 device and launch the barco pulse rpc application.

4.1, 03 dec 2019

  • [!] trim unwanted spaces.

4.2, 04 mar 2020

  • [!] fixed cp+8=1000 signed issue.

4.3, 29 apr 2020

  • [!] changing the logging to use .bak files.  the addition of the logarchiver application will compress the .bak files into zip archives.
  • [!] forcing cinema_ prefix on all log files”),

 4.4, 17 nov 2020

  • [!] Modified the macro web handler to get the list of loaded macros”),
                

4.5, 10 dec 2020

  • [!] Fixed issue working with outputs > 20.
  • [+] rolled the barco pulse api into cinema.jar.

Go to the Cinema.jar Application page for more information. The Cinema Knowledge-base has helpful information on how to use the features in Cinema.jar.

Cinema.jar 3.6 August 14, 2019

Name Version Release Date Size MD5
Cinema.jar - Update Project v3.6 Aug 14 2019 334.6 KB d96d4ae9b9adc4f0b8cdaf9bd87518f3

+ Adding web handlers for getDevice without a device for internal io getAll.

Cinema.jar 3.5 June 2, 2019

Name Version Release Date Size MD5
Cinema.jar - Update Project v3.5 Jun 02 2019 327.0 KB 57a834f2c5ac177b7b19b6dec52350ce

+ Added HTTP POST method to Macro Actions.

+ Added the ability the use HTTPS for GETs and POSTs

Cinema.jar 3.4.1 May 29, 2019

  Cinema.jar - Update Project v3.4.1 [ May 28 2019, 320.47 KB, MD5: 74f51ea7ccb40962eb2118bf16457c50 ]

  • Released May 28 2019

! Fixed a bug where the watchdog was no longer working. If the Cinema application crashed it would not be restarted.


Cinema.jar 3.4.0 May 16, 2019

  Cinema.jar - Update Project v3.4 [ May 16 2019, 320.36 KB, MD5: 63b627ede9c8a79710ddb3d7fd3ca852 ]

  • Released May 16 2019

+ Allow you to query the temperature sensor via a HTTP Request.  A JSON representation of the device will be returned.

As of now the only available devices are Type28 and Type7E...

Type28 is the temperature probe and Type7E is the environmental sensor.

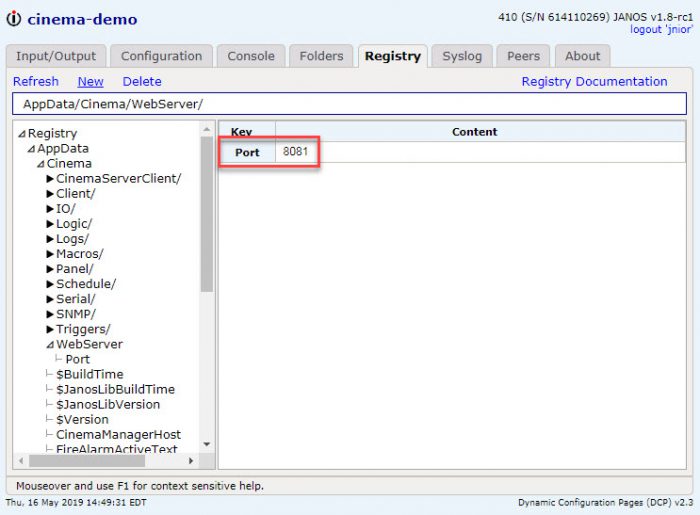
To enable this you will need to set the AppData/Cinema/WebServer/Port registry key. The JNIOR will need to be rebooted after this key has been changed. In this example I chose 8081. Port 80 or 443 is normally the default web server port. This web server port is an additional web server that cinema is hosting to handle these types of requests.

Name Version Release Date Size MD5
Tasker v4.0 Dec 18 2020 1.2 MB e0b99c9f4ffdb2294dab5596c9d9613f

4.0, 10 dec 2020

  • [+] variables that start with $$ are global variables.  These are global WITHIN the workspace.
  • [+] added Control Panel Switch implementation
  • [+] added a tasks.get WebSocket handler
  • [+] added a task.list WebSocket handler
  • [+] added http post functionality
  • [!] scheduling changes take effect immediately when a workspace is reloaded
  • [+] validation on task names, device names, logger names, signal names, trigger names, and schedule names to prevent spaces and bad characters.  Names can only be alphanumeric and can include underscores.

3.9, 18 nov 2020

  • [!] fix error where parameters used to have to be named starting with $.

3.8, 07 oct 2020

  • [!] fix error for only handling 8 output triggers.
  • [!] fix error where a temp probe couldnt be assigned to a variable.
  • [+] added http post functionality.

3.7, 02 oct 2020

  • [+] Added tracking the parent workspace name so that all of the tasks can be removed from the collection that belong to a workspace that is updated or removed.

3.6

  • [+] Added a tasks.get handler.
  • [+] Added a tasks.list message.

3.5

  • [+] Added a user.alert message.

3.4

  • [+] removed the requirement for the schedule start day.
  • [+] fixed the schedule reloading so that the new schedule takes effect and does not require a reboot.

Go to the Tasker Application page for more information. The Cinema Knowledge-base has helpful information on how to use the features in Cinema.jar.

Tasker 3.3 July 29, 2020

Name Version Release Date Size MD5
Tasker v3.3 Jul 30 2020 1.0 MB 5783b3bda071222b48775e5ffb9e4b3d
  • [+] adding duplicate instance check
  • [+] variables that start with :: shall be global
  • [+] add TCP Recv
  • [+] add TCP Close
  • [+] new execute script action
  • [+] uses new scripting engine
  • [!] fixed issue where dst timezone was not being logged
  • [+] adding action to prepend to file
  • [+] adding retry logic to external identifier objects. included creating external identifier parent class
  • [+] adding action to copy file
  • [+] adding action to move file
  • [+] add ascii tcp and serial servers for tasker control
  • [~] now preventing spaces in workspace names. current workspace files with spaces will be renamed with an UNDERSCORE

Go to the Tasker Application page for more information. The Tasker Knowledge-base has helpful information on how to use the features in Tasker.

Tasker 3.2 June 18, 2020

Name Version Release Date Size MD5
Tasker v3.2 Jun 18 2020 958.1 KB 953712536000b330ad267047b7ee274d
  • + added 4-20ma modules
  • + added 10v modules
  • + added email send attachment option

Go to the Tasker Application page for more information. The Tasker Knowledge-base has helpful information on how to use the features in Tasker.

Tasker 3.1 May 1, 2020

Name Version Release Date Size MD5
Tasker v3.1 May 05 2020 942.1 KB 47e03374e8a8791ec0a922f38e62f174
  • Added If / Else Block Task Action
  • Added While Loop Task Action
  • Added SNMP Trap Task Action - Tutorial
  • Help pages are in progress
  • Upload and download workspaces
  • Delete a workspace (Workspace is backed up)

Go to the Tasker Application page for more information. The Tasker Knowledge-base has helpful information on how to use the features in Tasker.

Tasker 3.0 April 20, 2020

It has been a while since Tasker was released. Tasker was a quick attempt at making a replacement for the Task Manager application that has been around for more than a decade, starting on the Series 3.

Ample time has now been taken to create a fully capable application that will be every bit as functional as Task Manager but offer the benefits of a rewrite, using configuration files and the latest web technology.

Some of the changes and new features are as follows:

  • Faster– The tasks are executed much faster and the triggers and schedule are monitored in real-time instead of once every 5 – 10 seconds.
  • Workspaces - Separate configuration logic into multiple workspaces. Then multiple workspaces can be loaded on the JNIOR at the same time.
  • Tasks are now separate from triggers. In Task Manager a Task was created and a Trigger was configured to get the Task to execute. In Tasker 3.0 Tasks are a separate entity that can be executed several different way including manual execution from the configuration page and being requested via an ASCII TCP connection.
  • Tasks can now send data via an Ethernet connection. To do this, a Device must be created so that the action can specify which device to send the data to. Multiple devices can be configured.
  • New Actions – We implemented actions that were previously available in Task Manager but are introducing many new actions like external module control, TCP communication and control structures.
  • Drag n Drop – Drag and Drop functionality makes it easier to design your Task logic.
  • Signals are now created to assign a specific property of a I/O point or sensor a name. The name can then be used in Tasks, Triggers or Loggers.
  • Loggers can be created to define the file name and schema or what data should be logged to that file. Each line in a Logger will be prepended with a timestamp followed by a comma. Loggers also allow you to define the number of files that should be kept with the given naming pattern. Name patterns can include date patterns. This will help you create a file per day for example.
  • Schedule – The schedule has additional options.
  • JSON Configuration files are used now instead of registry keys. Registry keys were limiting in size. The Series 3 could only store 255 characters in a registry key. It is much easier to upload configuration files to other JNIORs to replicate setups.
  • User Interface – The User Interface is now a native HTML application that uses the latest web technology. The latest web technology uses native HTML controls and Web-sockets to communicate with the JNIOR from your browser. This will allow accessibility over remote connections as long as port 80 is available. This is now consistent with the communication method used by the DCP. Task Manager had always used Java Applets. The Java Applets have not been able to launch in browsers for several years as they became frowned upon as security vulnerabilities.

This was just a short list of changes and new features. The documentation for Tasker should explain these topics as well as many others. If there is anything you don't understand please reach out to us for help. Additionally, if you have any suggestions or need the JNIOR to do something specific for you, please let us know.

For more information go to the Tasker Page

The Control Panel is a very useful add-on to the JNIOR.  It gives you manual switches, visual indicators and an audio alarm.  Each of these features can be configured and used in Tasker.  Let’s check out how!

Before addressing how Tasker works with the Control Panel, you’ll want to make sure its connected properly. You can do so by using the extern command. When you are sure the Control Panel is correctly connected you’ll be able to integrate it with Tasker.

Here are the actions associated with the Control Panel.  Each one will be talked about in depth further down this post.

Control Panel actions for Tasks in Tasker

Using the Control Panel Switches as a Trigger

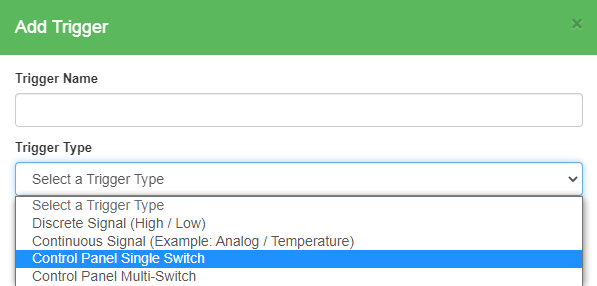
To enable the Control Panel Switches to be a Trigger that will be used to activate a Task is a very simple process. You only need to go to the trigger tab and add a trigger type set to the control panel switches.

Triggers have an automatic reset of 10 seconds after activating, but the reset can be made to activate based off other actions or different time intervals. Resets prevent the trigger from activating again until the reset condition has been met.

Using the Visual Indicators in a Task

The Visual Indicators on the Control Panel are the the 12 LEDs labeled L1 through L12.  The LEDs can be controlled by setting them to be OFF, ON, or to flash at different rates.  The LED will be on or flashing until it is turned off.

Set Control Panel LED Tasker example

Using the Audio Alarm in a Task

The Control Panel has a PC speaker on the back on the unit that can produce an audible alarm.  This is great for alerting people without the person needing to be looking at the Control Panel already.  Here is the setup when configuring the Alarm to be played.

The alarm plays with an oscillating sound.  You can select between slow, medium, fast, or custom.  Then a duration is needed in seconds followed by the volume on a scale of 0 – 100%.

Control Panel alarm Tasker example

If the custom option is selected then then additional options of the audio frequency to use and the duration of each beep are presented.

Control Panel alarm custom example

You can also elect to Silence and Alarm.  Maybe you have an alarm that plays for 60 seconds but can be silenced when someone responds to a given situation.  To do that we will use the Silence Alarm action.


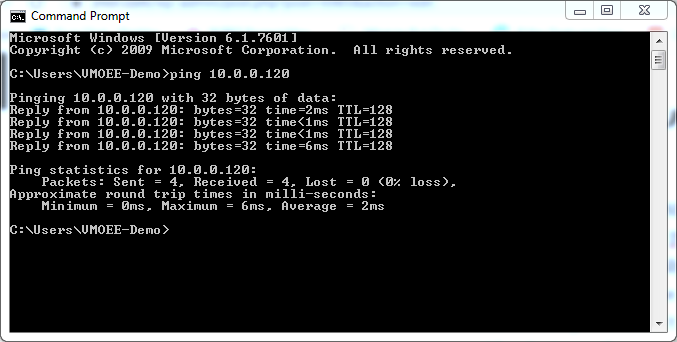
When you are using the JNIOR, you may want to change the IP address to fit a pre-existing schema for JNIOR’s on the network. JNIOR’s are set to use DHCP by default to get their IP address. DHCP searches a network the JNIOR is trying to connect to and finds an available IP on the network for it automatically. If the IP of the JNIOR gets set to 0.0.0.0, this is because a device on the network is already using that IP address. The JNIOR doesn’t want to interrupt pre-existing IP communication with a device on the network, so rather than take the IP and create a conflict between itself and the other device, it simply defaults its IP to 0.0.0.0. To confirm another device is on your network using the same IP, you can try pinging the IP Address that has the additional device on it. If the ping replies successfully, you’ll know you have another device somewhere that is on the network using that IP. In order to ping on windows, you simply open the command line and type “ping (IP address)”. NOTE: Not all devices on a network have ping capabilities.

Ping command in windows command line

To resolve the issue, you have to change the JNIOR or other device on the network to another IP that prevents the two devices from conflicting with each other. To change the IP address from the command line, you can do so using the ipconfig command, entering “ipconfig -a” followed by the new IP address you want to assign to the JNIOR. You can also do so from the Support Tool by right-clicking a JNIOR in the beacon tab and selecting Configure/IP Configuration, which opens a dialog box that can be used to set the IP of the JNIOR as well. This is where DHCP can be disabled as well, which can fix a 0.0.0.0 IP when DHCP can’t find an available IP address on the network, or if the network doesn’t support DCHP.

Note: This functionality will require at least Tasker version 3.9

There are times when we want to log a temperature.  To do this we need to select a time interval between samples.  This interval can either be too short or too long.  Very rarely can we get the perfect interval.  A short interval leads to redundant data where the temperature doesn’t change often and several samples log the same temperature in a row.  A long interval can hide valid temperature changes.

So we ask ourselves, what do we really want?  The answer is usually that we want to know when the temperature changes.  Using the setup below, we can achieve the desired functionality. 

Configuration

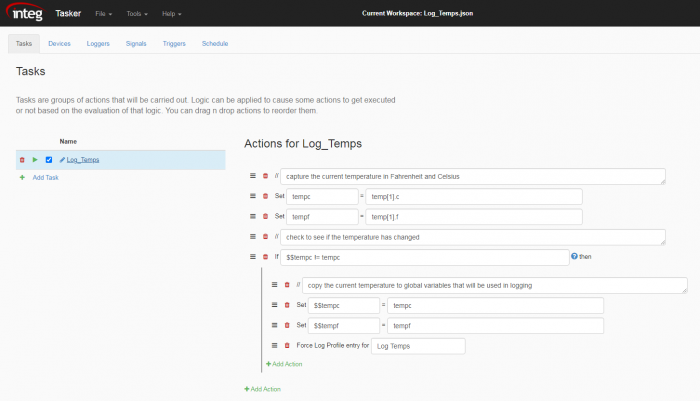
The following image shows how we can set up a Task with Variables and Logic to only Log when the temperature changes.  The global variables make sure the current temperature values that are used in the logic are used when making the log entry.

Tasker Logging workspace

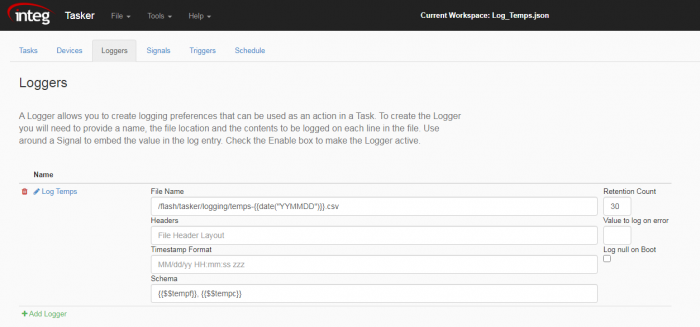
This screenshot shows how to configure the Logger to use the global variables.

Loggers in Tasker

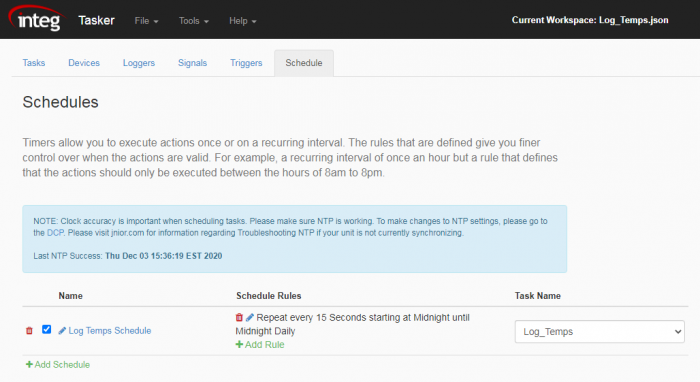
This screenshot shows configuring the schedule to call the Task with a short interval.  The logic within the Task is responsible for making sure the log entries only occur when there is a valid temperature change.

Scheduled Log Tasks in Tasker

Result

Here is the result of a the functioning configuration over the past 15 minutes.  You’ll notice that the temperature changes, but it tends to bounce back and forth between two or three values.  We can handle that in another article!

Logged Temperature values

A lot of JNIOR applications log information about what they are doing. This information can be about different things. Sometimes the application is purposely creating log files to keep track of data such as water levels or I/O changes. Logs can also be used to keep track of information about the application itself and if its run into any errors. Here is a quick post on how to look at Logs on a JNIOR.

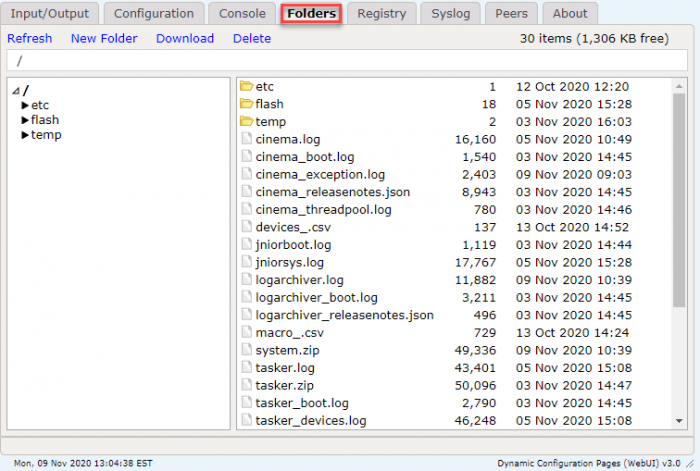
To access information on a Series 4 JNIOR, you’ll first need to open the JNIOR WebUI. Once the on the JNIOR WebUI, you’ll then access the folder tab. Here you can see a list of all the files located on the JNIOR. Navigating through the folder shows the different files you can view, including log files.

Folders tab of JNIOR Web Page

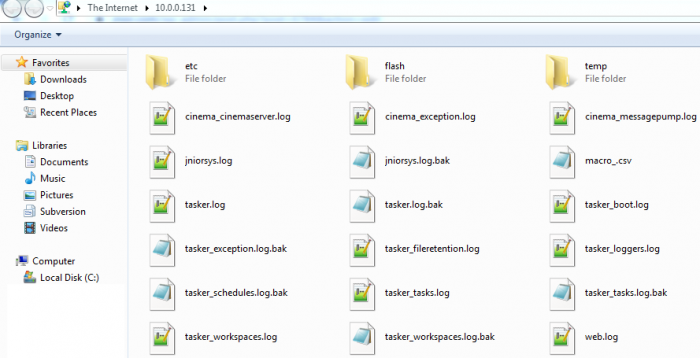
Another way to access files on either a Series 3 or 4 JNIOR, you can open the File Transfer Protocol from the Support Tool. To start you’ll open the Support Tool, then in the beacon tab you’ll right click on the JNIOR and select Tools/Open FTP. You’ll then see a dialog open asking for the JNIOR’s username and password. Once you enter that, you should see all the available files on the JNIOR, including log files.

NOTE: The address in file explorer will match your JNIOR’s IP Address

When using Cinema, Serial PLUS, or Serial-To-Ethernet applications people will be generally using the serial port to talk to other devices or send commands. Knowing what registry keys need to be set to when communicating on them is important. This tutorial is for setting the registry keys up for the Serial Control Plus application.

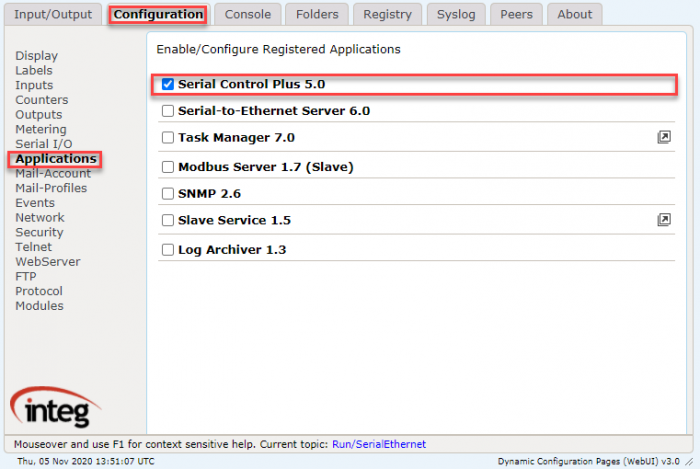
To start, when using Serial Control, the connection that will be set up is accessed through the command line once all the registry keys have been set. So first thing is to go to the support tool and go to applications. Once there make sure that the Serial Control application is checked, otherwise check it and reboot.

Configuration tab for JNIOR Web Page

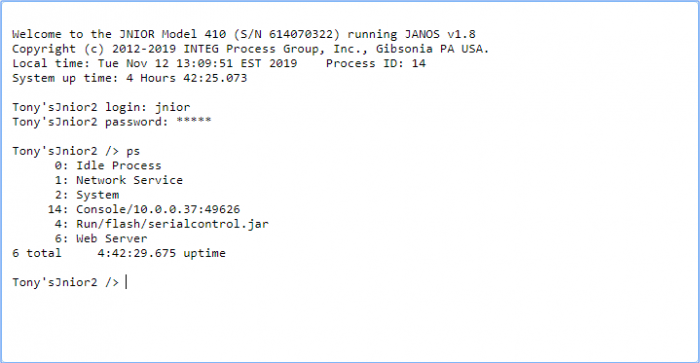
Once the JNIOR reboots, go to the console tab and type “ps” to see if the application is running.

ps command for JNIOR command line

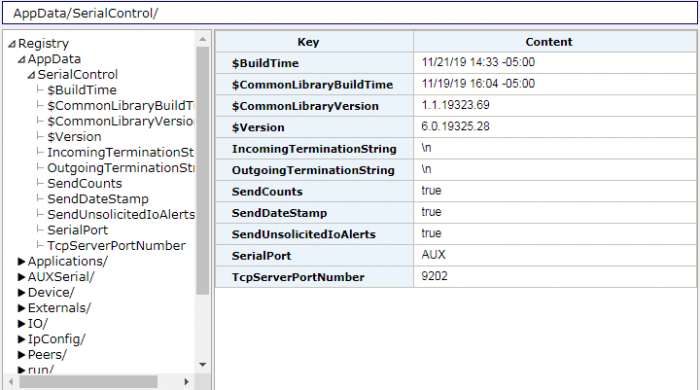
If it is then next go to the registry tab and in the section App-Data find the Serial Control program.

Registry tab for JNIOR Web Page

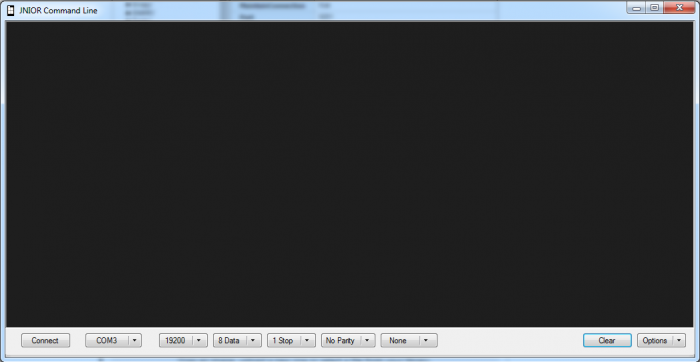
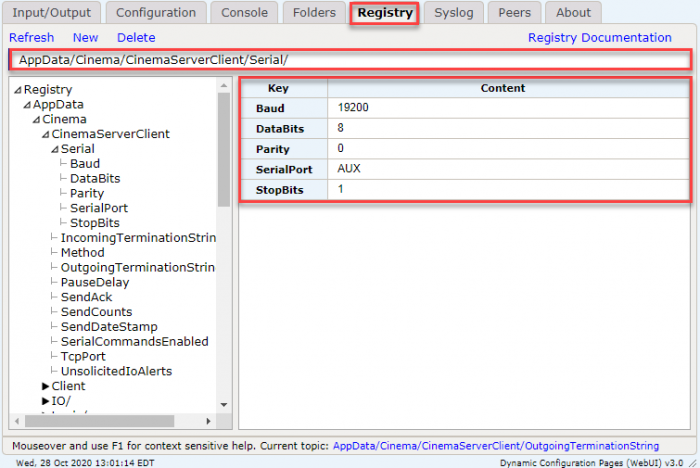
Here is where all the information for creating the serial connection is contained. If you are connecting through COM3 at the command line, make sure that the SerialPort value is set to AUX if the port being used is the Auxiliary port and not the RS-232 port. If you want to connect through TCP, make sure you set a TcpServerPortNumber value set, a good example one is 9202. Now all the values should be set to connect serially to the JNIOR. Go to the JNIOR support tool and select tools –> command line. This will bring up the command line to give serial commands to the JNIOR. 

JNIOR telnet session

When using Cinema, Serial PLUS, or Serial-To-Ethernet applications people will be generally using the serial port to talk to other devices or send commands. Knowing what registry keys need to be set to when communicating on them is important. This tutorial is for setting the registry keys up for the Serial-to-Ethernet application.

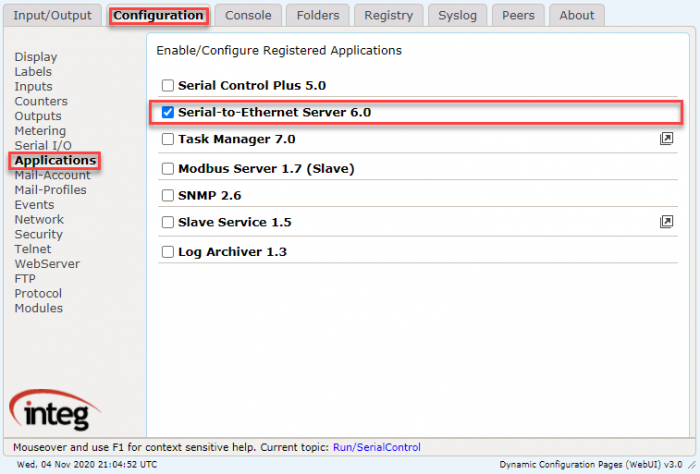
To start, when using Serial-to-Ethernet, the connection that will be set up is accessed through the command line once all the registry keys have been set. So first thing is to go to the support tool and go to applications. Once there make sure that the Serial-to-Ethernet application is checked, otherwise check it and reboot.

Configuration tab for JNIOR Web Page

Once the JNIOR reboots, go to the console tab and type “ps” to see if the application is running.

ps command for JNIOR command line

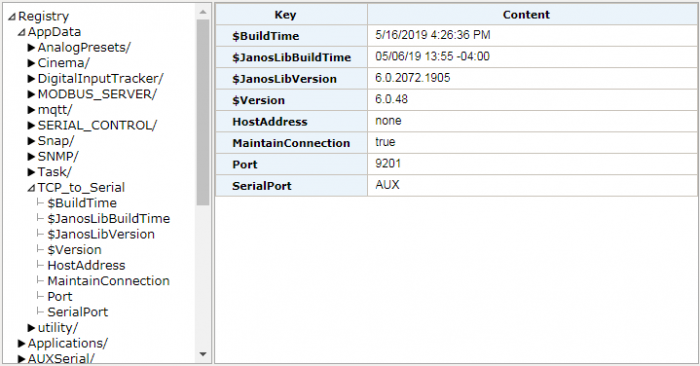
If it is then next go to the registry tab and in the section App-Data find the Serial-to-Ethernet program.

Registry tab for JNIOR Web Page

Here is where all the information for creating the serial connection is contained. Make sure that the SerialPort value is set to AUX if the port being used is the Auxiliary port and not the RS-232 port. Now all the values should be set to connect serially to the JNIOR. Go to the JNIOR support tool and select tools –> command line. This will bring up the command line to give serial commands to the JNIOR. 

JNIOR telnet session

The DMX application does not ship preinstalled. You MUST obtain the application from our website. There is a download on the website that will be opened in the JNIOR Support Tool and published to the JNIOR. This is called an Update Project.

Here are links to latest versions of the JNIOR Support Tool and the Cinema application. NOTE: The DMX link below is for new installations only. If you already have the DMX application on your JNIOR and only need to update to a newer version, visit our DMX page to download our other update project for DMX that isn’t for new installs.

Name Version Release Date Size MD5
JNIOR Support Tool v7.15 Nov 20 2023 9.9 MB d9f2ddfb2bcd13a886316d61d8909ea1
DMX Application v3.7 Oct 31 2023 656.0 KB b90aa191046fab7c7a0e05137833d95a

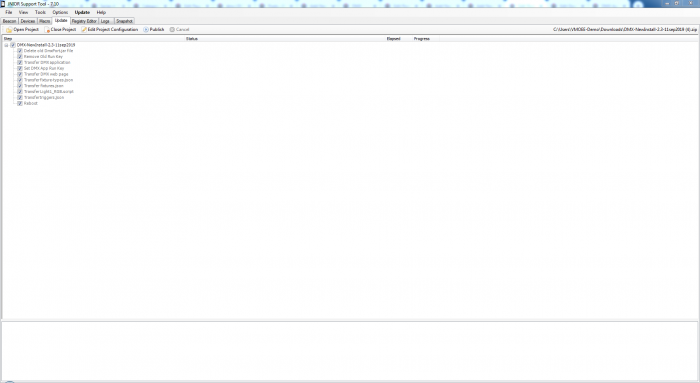
After installing both the JNIOR Support Tool and the DMX Update Project, you’ll want to open the Support Tool and click on the Update Tab. Once there, the first thing you’ll want to do is select the Open Project button, and select the DMX Update Project you just downloaded. When you open the DMX Update Project in the Support Tool you will see the following.

DMX Update Project

In the DMX application you can create fixtures, scripts and triggers to control the 512 DMX channels for your external lighting device.

In the DMX application, you create scripts to change the 512 DMX channels. Once you have a script, you’ll then want to be able to activate it. One way to set up a script to activate is by giving it a trigger. This post will explain how to create a trigger for a script. 

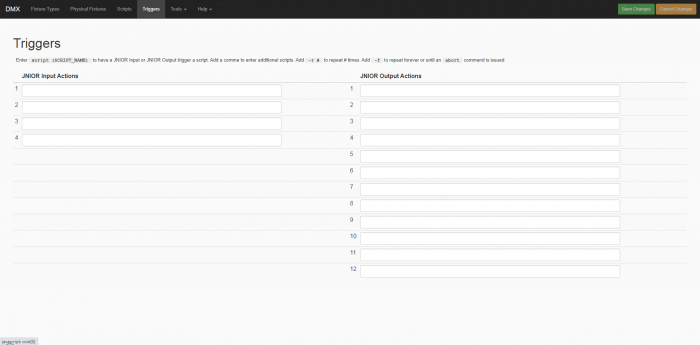
Open the DMX application, and go to the Triggers tab. Once there, you’ll see the I/O layout for your JNIOR, showing how many inputs and outputs are on it. To setup a script to trigger on one of the I/Os, you’ll simply enter “script (SCRIPT_NAME)” into one of the I/O spots. You can additionally enter -f or -r after the script name to add additional effects to the script running. You can also enter “abort” into one of the I/O spots to make any script stop running when that I/O value occurs.

Triggers for DMX application

Once you’ve entered and saved a script name value in an I/O slot, you should now have a script set to run when the selected I/O value activates.

When you have a fixture that you want to control through the DMX application, you use a script. This post will explain how to create one. 

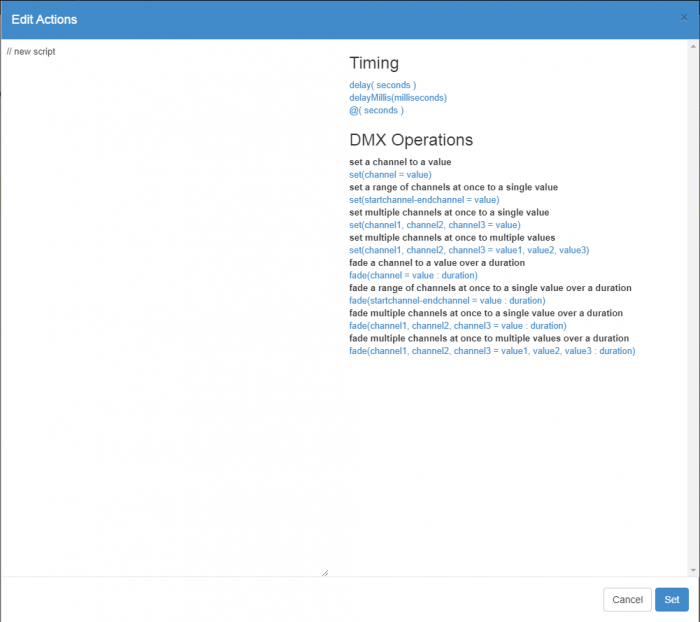
To start, you’ll open the DMX application and go to the scripts tab and click the add script button which the application will then prompt you what you want to name the new script. After entering the new script’s name, you’ll go to it in the script tab and select the green pencil icon under the script column. The Edit Actions dialog box will open, where you can then enter actions for the script to perform. The 3 main actions are the delay, set, and fade. How you enter those actions in the script, and the different parameters an action can use, are shown on the right side of the dialog box.

Scripts for DMX application

After you’ve entered your actions in the script, you’ll click set at the bottom right of the dialog. Now when the script runs it’ll edit the channels referenced in the script actions.

In the DMX application, you create fixtures that pick how many channels of the 512 DMX channels will get set along with where the starting channel for that fixture is.

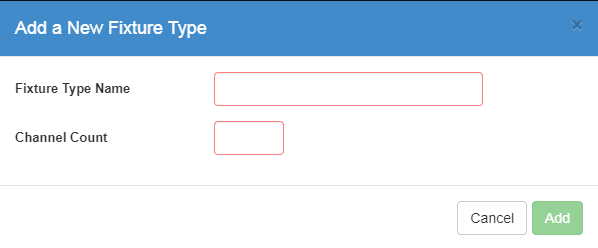
To start, you’ll need to create a DMX fixture type. In the Fixture Types tab, you’ll click the add fixture type button. You’ll then get the New Fixture Type Dialog, where you can set the amount of channels the fixture will use of the 512 DMX channels, and what they are named.

Fixture type for DMX application

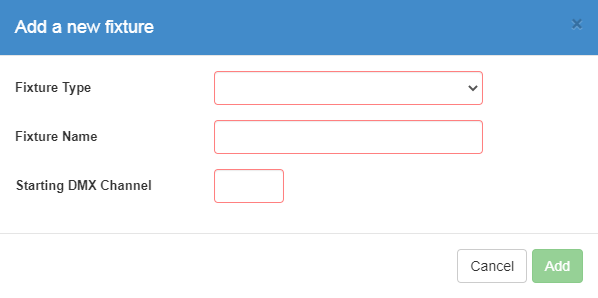
Once you have the fixture type created, you’ll the go to the Physical Fixtures tab and create a fixture of that type. Click on the add fixture button, which will open the New Fixture Dialog, where you can set the Fixture Type (you use the one you just created), name of the fixture, and the starting channel for the fixture.

Fixtures for DMX application

Once you’ve created the fixture, you should now have a fixture that uses the amount of channels set in the fixture type settings, and starts on the channel set in the physical fixture settings.

When using the Cinema application, you’ll want it to be able to receive commands from other devices so its macros can be trigger. In the registry of the JNIOR, Cinema’s registry contains the CinemaServerClient and PreshowClient registries. These are what can be configured to listen for those connections to external devices.

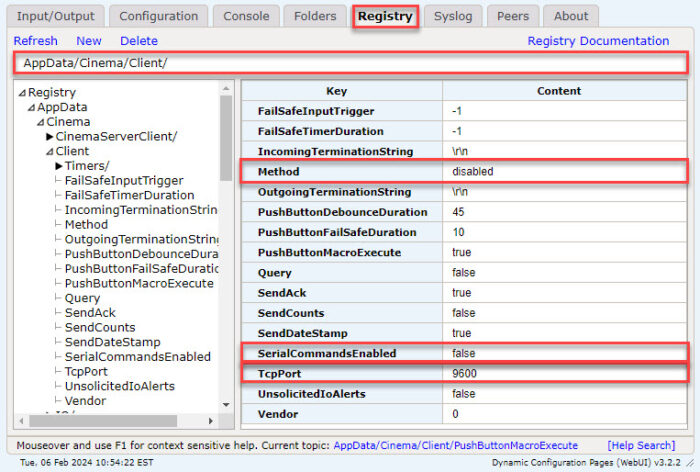
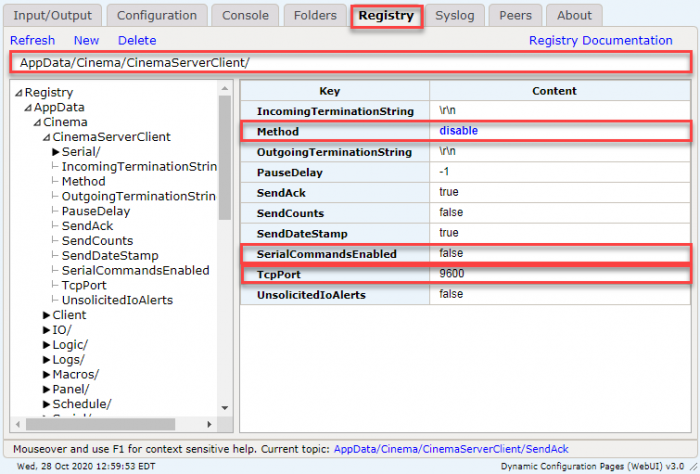
While accessing the JNIOR WebUI when Cinema is installed, you can access the AppData/Cinema/CinemaServerClient or the AppData/Cinema/Client registry folders to configure the connections made using Cinema. The PreshowClient and CinemaServerClient are connections made to either a Preshow System or Cinema Server through TCP or Serially that allow control of outputs, I/O feedback, and the ability to interact with various devices using macros.

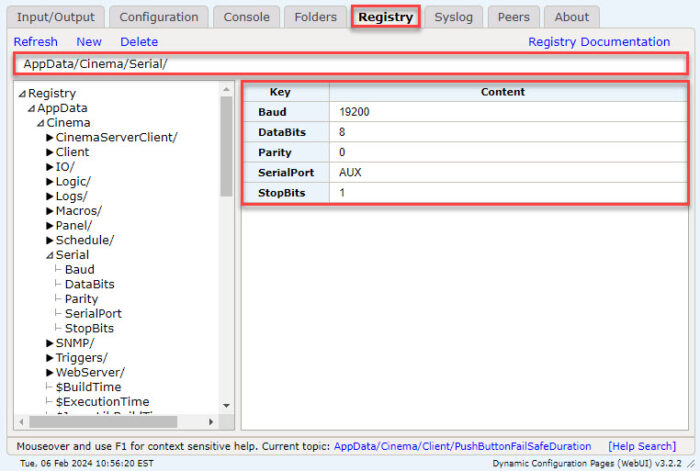
Inside both registry folders are multiple registry keys. The TcpPort key is where you can set the port number for an Ethernet connection to other devices. (Any valid TCP Port number will work, but we set it to -1 by default so it will not listen for TCP connections until its set). For serial connections, you need to set the Method key to serial and the SerialCommandsEnabled key to true. You’ll then need to go to the AppData/Cinema/CinemaServerClient/Serial for the CinemaServerClient or AppData/Cinema/Serial for the Preshow Client, and set the serial connection to whatever serial setting you want the JNIOR and your external Device to connect on.

NOTE: You can have both the Preshow Client AND the Cinema Server Client active at the same time. Each one can have a Serial Connection and a TCP connection active. You can have multiple devices connect to the same Cinema TCP port to control Cinema. Therefore, while you can have more then four devices connect to Cinema at the same time, it can listen for at most four different types of connections at the same time:

  • Preshow Client Serial Connection (1 connection)
  • Preshow Client TCP Connection (Multiple connections)
  • Cinema Server Client Serial Connection (1 connection)
  • Cinema Server Client TCP Connection (Multiple connections)

Just keep in mind that if both are using TCP then they can’t use the same Port Number, and if both are using a Serial Connection, they can’t use the same Serial Port.

Preshow Client

Preshow TCP Settings
Preshow Serial Settings

Cinema Server Client

Cinema Server Client TCP Settings
Cinema Server Client Serial Settings

When using the control panel, you might want to have the switches trigger macros you created in the support tool. This post will explain how to do just that. To start you’ll need to have created a macro in the support tool. If you haven’t done that already and don’t know how, here is a post on how to do it. You’ll also need to have installed cinema on your JNIOR as well.

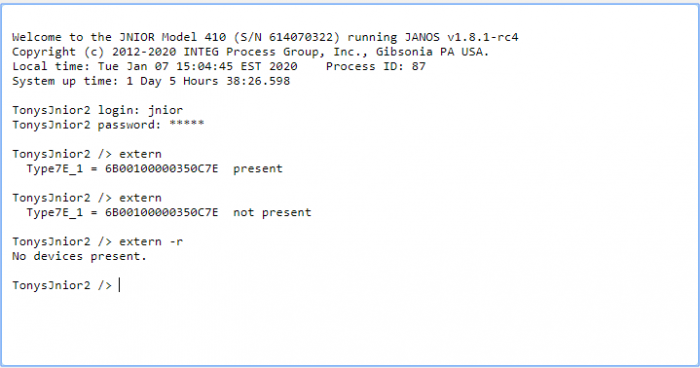
Next, you’ll want to makes sure that your control panel is properly connected. You can check what external devices have been connected to the sensor port by opening the JNIOR’s WebUI, going to the Console tab, and after logging in entering “extern” into the console. If you have left-over information from previous external devices that you’d wish to get rid of, then you can remove devices no longer present by typing the extern -r command.

extern command for JNIOR command line

Once you have your macros created and published to a JNIOR along with  your control panel being connected, you can now hook up the macros to the control panel using the JNIOR’s registry. Open your JNIOR’s WebUI and go to the registry tab. Once there, you’ll then go to AppData/Cinema/Panel.

Control Panel registry for JNIOR Web Page

Once here, you’ll simply enter the macro name on whichever switch trigger you want to activate the command. Now the macros you created will send a command when you hit a switch on the control panel.

This application will monitor the digital inputs.  The corresponding output is set when an input pulsed.  That output remains active until a different input is pulsed.  This application effectively latches the output to represent the last input that transitioned from low to high.

package com.integ.latchrelays;

import com.integpg.system.IoEvent;
import com.integpg.system.Iolog;
import com.integpg.system.JANOS;
import java.io.IOException;
import java.util.Date;

/**
 * This application will monitor the digital inputs. The corresponding output is set
 * when an input pulsed. That output remains active until a different input is pulsed.
 * This application effectively latches the output to represent the last input that
 * transitioned from low to high.
 */
public class LatchRelaysMain {

    public static void main(String[] args) throws InterruptedException, IOException {

        // create an Iolog instance and a timestamp representing the last time an 
        // event occurred.  we will start with a value of zero indicating only new events
        Iolog iolog = new Iolog();
        long timestamp = 0;

        // loop forever
        while (true) {

            // refresh the oilog with the timestamp of the last input event
            iolog.refresh(timestamp);
            IoEvent[] inputEvents = iolog.getInputEvents();

            // only process if there are events
            if (0 != inputEvents.length) {
                System.out.println("inputEvents.length = " + inputEvents.length);

                // loop through the input events
                for (int i = 0; i < inputEvents.length; i++) {
                    IoEvent inputEvent = inputEvents[i];
                    timestamp = inputEvent.timestamp;
                    System.out.println("timestamp = " + new Date(timestamp));
                    int highTransitions = inputEvent.mask & inputEvent.states;
                    boolean isTransitionHigh = (0 != highTransitions);
                    System.out.println("isTransitionHigh = " + isTransitionHigh);

                    // if the event was a transition high then set the outputs to 
                    // represent the state of the inputs that transitioned from 
                    // low to high.  we will use all outputs here
                    if (isTransitionHigh) {
                        JANOS.setOutputStates(highTransitions, 0xff);

                        // we are only looking to process the most recent inpput 
                        // transition from low to high.  so once we find one we 
                        // can abort the loop.
                        break;
                    }
                }
            }

            // sleep for a little bit of time to not monopolize the CPU
            Thread.sleep(50);
        }

    }

}